


I am in Love with my Remodeled Chicken Coop
I am in love with my refurbished chicken coop! I had wanted chickens so badly. But I wasn’t really sure where to start. I kept struggling with two main factors. One was the idea of spending a huge amount of money on buying a coop. They are so expensive. And two, building one would be cheaper, but I kept thinking I needed a GIANT coop, and again we were back to the money. haha
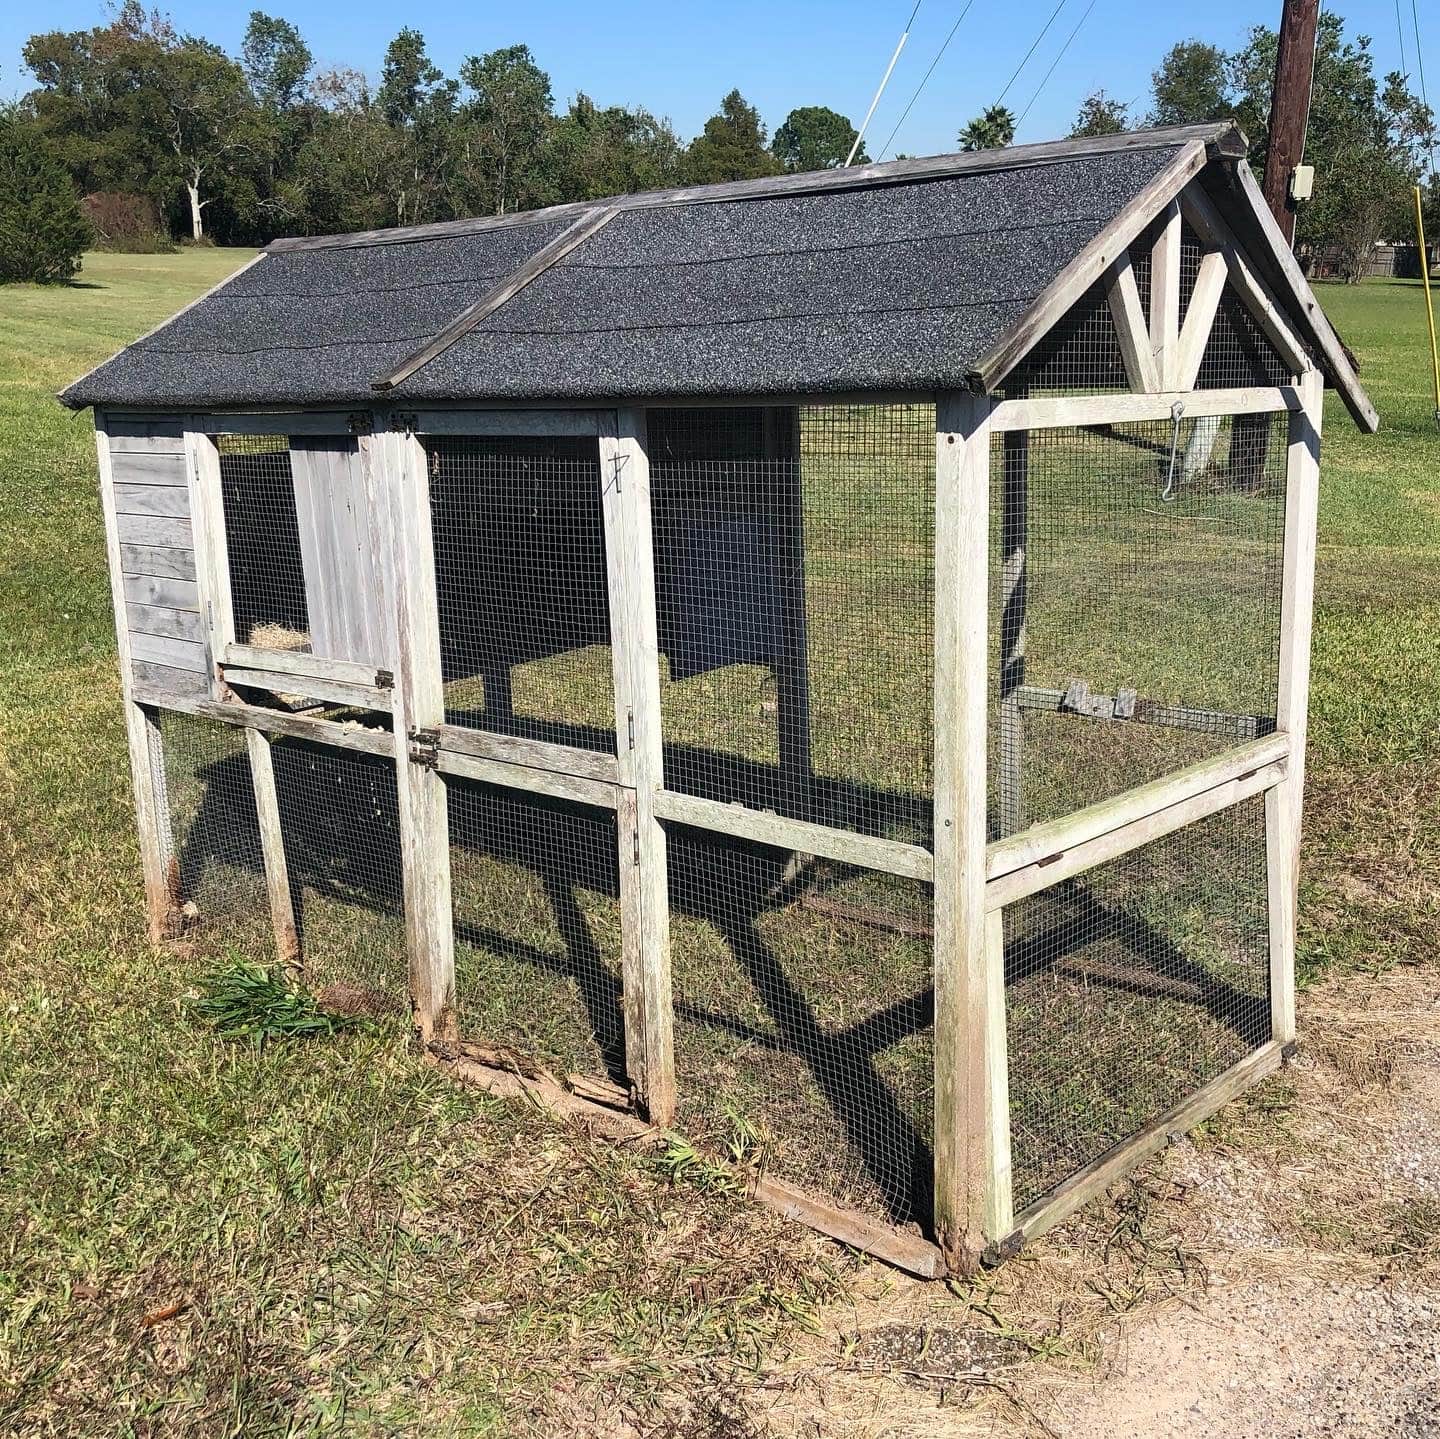
SO when my neighbor called and said we just bought a new coop, would you like my old one? I jumped on it… Needless to say – when my husband saw it he was NOT impressed with my choices. bwahahahaha
This post contains affiliates links. This will not cost you anything but helps us to offset the cost of running the blog. We only share products we are using and are items we would recommend to a friend. Thank you for your support!
Click ‘HERE’ for more info.
Okay – maybe I could see why. There were many issues with it. Part of the coop floor was missing. The inside wall was half gone. And the wood all across the bottom was rotten and falling apart.
But all I saw was a place to finally start. I could see the little coop being a home and a place to start raising my first set of chickens. And if I was any good at this chicken stuff and wanted to go bigger this could be like my chicken hospital for sick chickens. Or a place for a new bird if I decided to expand before introducing them to the flock.

So I got busy fixing it up.
I started by pulling the rotten boards off and reinforcing the coop by adding 2X6s to the bottom. The way the chicken coop was set up before was the nesting box was just part of the main inside area. The chickens would roost on one side and lay eggs on the other. I saw a lot of poop everywhere and felt like this type of setup would just leave the chickens confused about where to go to lay eggs. So I built a separate area to hold three nesting boxes. I had spent tons of time on Pinterest so I knew I wanted it to open from the top.


I framed the nest box out using 2x2s and used cedar fence boards to build the floors, walls, and the lid of the box. After it was all built, I added these nifty gas struts to lift the lid and hold it up while I am gathering eggs. I LOVE LOVE LOVE them!
Upgrading the Roof
The coop had an old roof and there were a couple of areas that were beginning to get a little soft. But for the most part, it was sound. But I felt it would be just a matter of time before it started to have issues. Believe it or not – I barely bought anything for this project. I had some roofing material saved to build another box in my raised garden and I decided to use it on the coop.
Oh – I am so happy I did! Not only do I love the look of the chicken coop, BUT I love how it matches my garden!!

Another thing I knew I wanted to do was use a ‘deep litter system’. I wanted the coop to be efficient yet easy to maintain. (Mostly easy – who are we kidding!? haha) So I pulled out what was left of the floor and lowered it to give me a few more inches to put the bedding in. Again I used the cedar fence boards to build out the sidewalls and then cut plywood to build the floors.
Then I built the inside wall leading to the run and created the door. I used the cedar fence boards here too. I love the shiplap look. The existing walls already used narrow boards that created the same look. I felt the cedar boards just complimented it and kept the same vibe, even if they were different sizes.


Now to Accessorize
After all the structure of the coop was built, I began building doors and windows. I had so much fun with this because I used black wrought iron-looking hinges, handles, and locks to give it a farmhouse feel.
I built the door into the coop as a sliding door so I can easily open and shut it by simply pulling on a piece of paracord I had attached to it that lifts it up and down. The door opens to the outside of the coop to easily shut it on cold nights to help keep the cool winds off the birds.
I made a door into the coop with a second window inside of it to open. This helps to give them a breeze. I hinged it at the top though to help prevent rain from getting into the coop. It creates a little cover when opened.
There had already been a window on the chicken coop so I created a sliding door to again protect the chickens from the winds. I also extended the roof a bit to help protect the window from a good downpour.
I then got busy painting the outside!! This is when the real fun started. Because what I had envisioned in my head started to show up as a reality and I was just so tickled!


Getting Close to Being Done…
I know I did things a little out of order with this project. But it is just the way it worked out. After getting everything painted and sitting back enjoying the look of the coop, I really started to think about the wood rotting around the bottom and thought I didn’t want to put all this work into the project only to have issues occur super fast. So I decided to lay pavers around the bottom of the coop.
THIS was a chore! Haha. I had my girls help me with this. I would lift up one side of the coop and have them push a brick paver into place. Then I would lift it again and have them place the 4x4s on the brick paver. This gave me enough room to lay the hardware cloth and all the bricks around one side. Then we repeated the process on the other.
My girls are such amazing helpers!!


One of the last details left was to seal the inside of the coop so it would be easier to clean in the future. Sealing it also helps to keep bugs, mites, and bacteria from growing easily. It also sealed up the wood to help it not rot from the composting pine and poo sitting against it.
Once the seal dried, I filled the floor up with pine shavings and laid in the 2″x3″ roosting bars I had cut into place. I added a cute hanger to hold the egg basket on the side and even though we weren’t using the nesting boxes yet I put artificial grass in there and ceramic eggs so when the time came we were ready to go!!


The coop was now ready to live in. WHICH was good because my chickens were 7 weeks old now. They had all their feathers grown in and were ready to move into their new home.
My Refurbished Chicken Coop Reveal


Here is my refurbished chicken coop is in all its glory!


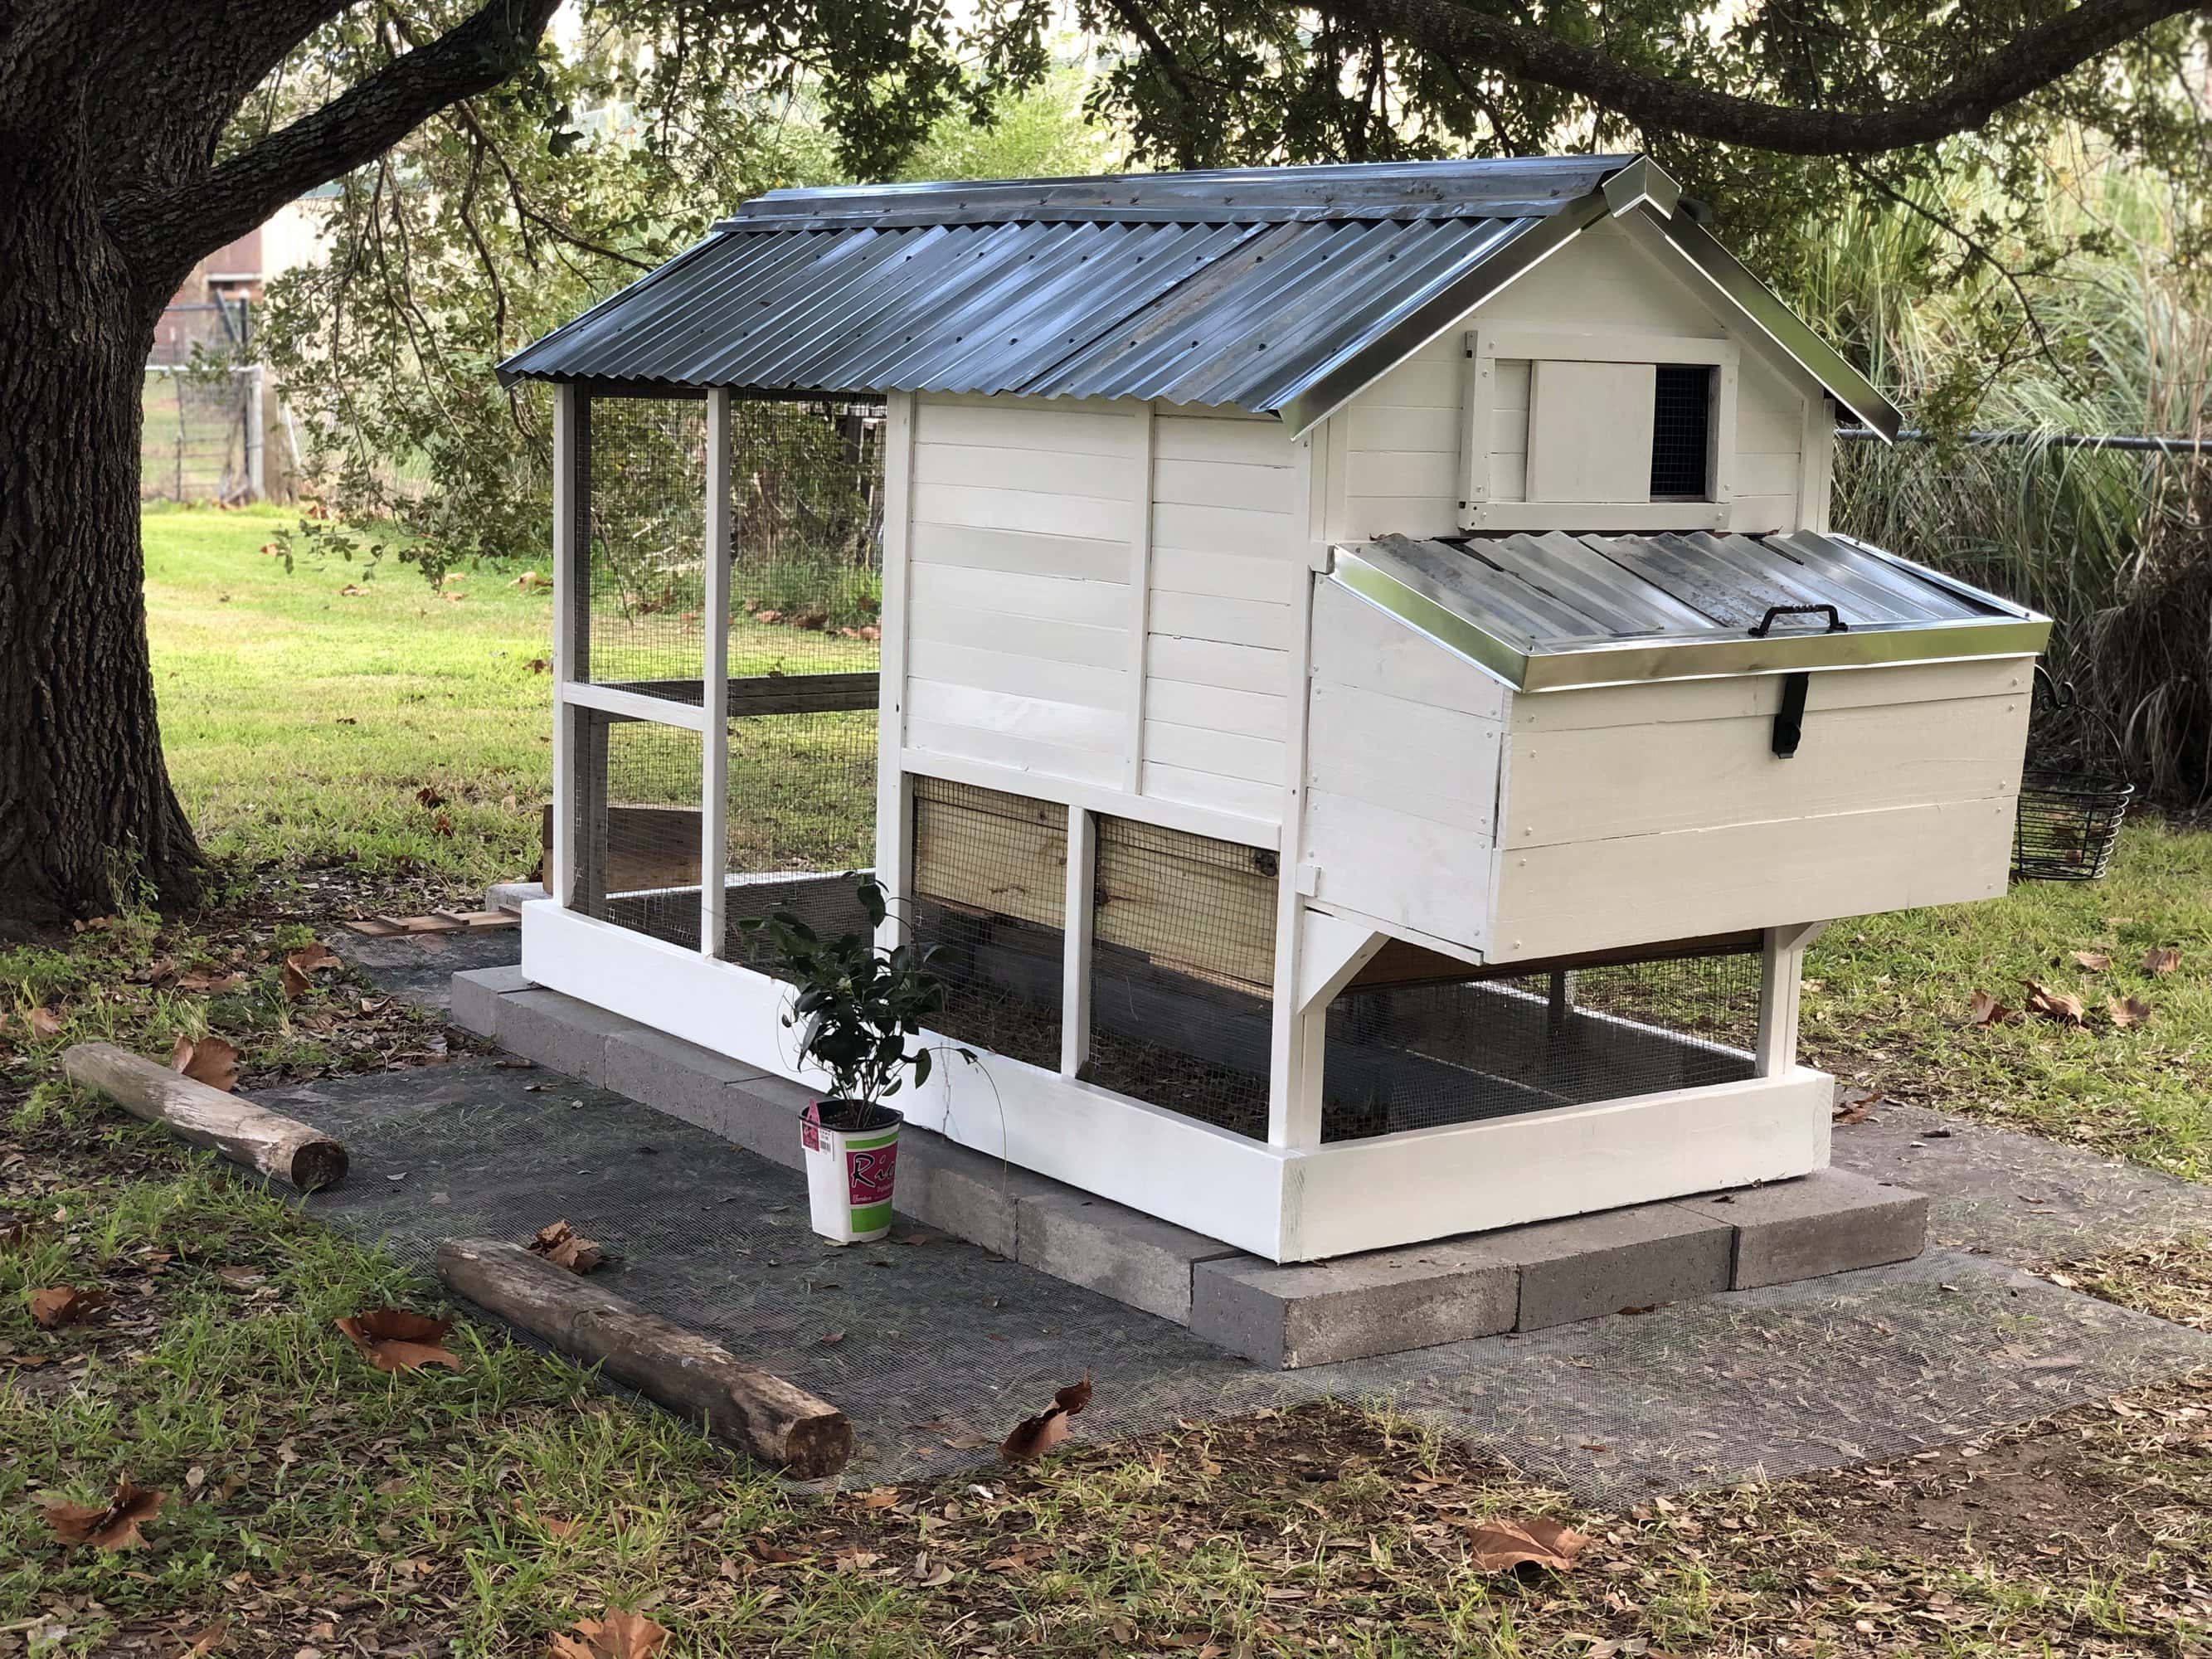
After moving the girls in, I later built the Chicken Feeder and Watering System. This Chicken Coop maintains itself for 5 days easily! The only thing I do is let them out each day, play with them, stir the bedding occasionally, and of course gather eggs.


6 Comments
Pingback:
Pingback:
Pingback:
Sue
Just wondered what wood seal you used for rhe interior?
Lisa Scott
Hello! So with anything I upgraded, I just used plywood and fence boards. They were untreated because I didn’t want to put treated wood in the coop area. The part of the coop that was already built was made from cedar wood. The Pond Shield is really easy to use and will stick to all woods.
Pingback: